Summary:If you're in the market for a Bottle Cap Mould, you've come to the right place. We offer a comprehensive list of manufac...
If you're in the market for a Bottle Cap Mould, you've come to the right place. We offer a comprehensive list of manufacturers, including suppliers and exporters. Our comprehensive database can help you source high-quality products and services. Using a list of manufacturers will enable you to find the one that meets your needs and specifications. Read on to learn more. This article will give you more information about the different types of moulds available and how you can ensure that you're sourcing the right product.
Using a cap mould is easy. All you need is a few tools and some steel, and you'll be ready to start production in a day. Generally, a 16-by-16-inch column will work well, but the length and width can vary between columns. Measure the columns and transfer those measurements onto two-by-four framing. Then, cut the pieces with a circular saw and use a dust mask to protect yourself from the materials used.
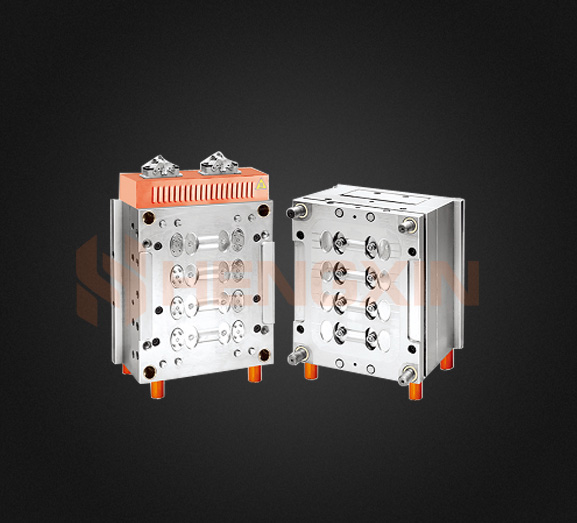
The best method to manufacture a cap mould is to buy a cap mold. You can then select the type of mould you want and purchase it. These cap moulds are remarkably versatile, with a range of cavities from one to 96. Moreover, you can choose a mould that matches your specifications based on the material and design. They are also inexpensive, and you can save more money by buying them in bulk.
Once you've selected the type of mould you'd like to order, you'll need to build it. Creating a concrete cap mould will take between six and eight hours, and it will be made from 16-by-16-inch columns. The actual size of the columns will vary, so the dimensions should be added up and the 2-by-4 frames added to them. Then, trace the dimensions of the mould on a sheet of 3/4-inch plywood. Once the base is in place, the construction can begin. It's important to wear safety goggles and dust masks while working with concrete.
A concrete cap mould is a simple process that requires only six to eight hours to complete. You can create one on your own with a 16-by-16-inch column. Depending on the size of the column, it may vary slightly from the measurement of the cap mould itself. When constructing a concrete cap mold, make sure you take the measurements of the columns and transfer them to the 3/4-inch plywood. Then, use a circular saw to cut the plywood.
In addition to making a concrete cap mould, you can also make a mould for a flip-top cap using the same method. It is possible to make one on your own on a sixteen-inch column, but you must know the measurements of your columns before you start. You can also use a two-by-four-inch frame. Then, transfer the measurement of the cap mold onto the 3/4-inch plywood.
You can design a Cap Mould with a hot runner system or a cold runner system, and you can expect it to take 2 hours to complete. A good supplier will provide you with a quotation within two working days, and a weekly report on the progress of your mould. Then, you can select a mould for your brand. This is a great way to find a cap mould that will meet your specifications.
In order to make a concrete cap mould, you'll need a 16-by-16-inch column. The size of the column varies a bit, so you'll have to add the measurements of the mould to the column to make the mold. You'll need to cut the two-by-four frame into pieces of 3/4-inch plywood. After this, you can start the construction of your concrete cap mould. The process of making a Cap Mould is a quick and effective process and requires careful planning.
Creating a Cap Mould involves a few steps. You need to first determine what type of Cap Mould you need. A 16-inch by 16-inch column is ideal, but you may need to use another size to create a more complex mold. In this case, you should take measurements of the two-by-four columns and the size of the columns to make a concrete cap mould. Once you have all the measurements, transfer them to a 3/4-inch piece of plywood.


